<脚本type = " text / javascript”> window._wp_rp_static_base_url = 'http://wprp.zemanta.com/static/'; window._wp_rp_wp_ajax_url = "http://coursecatalog.m-y-c.net/help/wp-admin/admin-ajax.php"; window._wp_rp_plugin_version = '3.5.4'; window._wp_rp_post_id = '37261'; window._wp_rp_num_rel_posts = '5'; window._wp_rp_thumbnails = true; window._wp_rp_post_title = 'ZenCart.+How+to+insert+Google+map+on+the+Contacts+page'; window._wp_rp_post_tags = ['contact', 'google', 'map', 'zencart', 'zencart+%3F%3F%3F%3F%3F%3F%3F%3F%3F', 'ap', 'map', '100', 'aol', 'googl', 'support', 'disabl', 'height', 'view', 'browser', 'javascript', 'pre', 'lip', 'a', 'code']; window._wp_rp_promoted_content = true; <脚本type = " text / javascript”> window.__lc = window.__lc || {}; window.__lc.license = 9531830; window.__lc.group = 3; (function () { var lc = document.createElement('script'); lc.type = 'text/javascript'; lc.async = true; lc.src = ('http:' == document.location.protocol ? 'http://' : 'http://') + 'cdn.livechatinc.com/tracking.js'; var s = document.getElementsByTagName('script')[0]; s.parentNode.insertBefore(lc, s); })();

Categories

Featured templates

<脚本type = " text / javascript”> $('.header .sidebar_banner').remove();

ZenCart. 如何在联系人页面插入谷歌地图

Harry Baker November 19, 2014
Rating: 5.0/5. From 2 votes.
Please wait...
ZenCart. 如何在联系人页面插入谷歌地图

本教程将向您展示如何在ZenCart的联系人页面上插入谷歌地图:
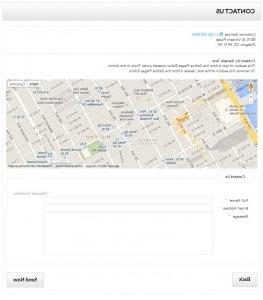
ZenCart-How-to-insert-Google-map-on-the-Contacts-page1.jpg
  1. Copy the tpl_contact_us_default.php 文件从默认模板到自定义模板.

    从您的服务器下载此文件到您的计算机: \ \ templates \包括template_default \ templates \ tpl_contact_us_default.php.

    Upload the file to: \ \包括\ templates \ themeXXX \模板 folder

    现在检查你的联系页面在网络上是否仍然正常工作 browser.

    themeXXX 是否为您正在使用的模板的文件夹名称. If you already have the tpl_contact_us_default.php 在你的“themeXXX”文件夹中,不要删除 overwrite it. Proceed directly to Step 2.

  2. Open the tpl_contact_us_default.php 文件在您的计算机上与任何代码 editor 可用(notepad++, PSPad, DreamWeaver等.),并将以下代码粘贴到第54行左右:
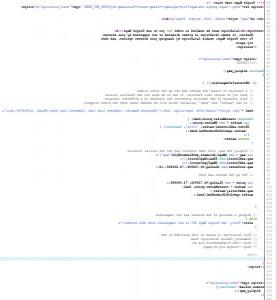
    ZenCart-How-to-insert-Google-map-on-the-Contacts-page2.jpg


  3. 应该对tpl_contact_us_default进行的更改.php file are the following:

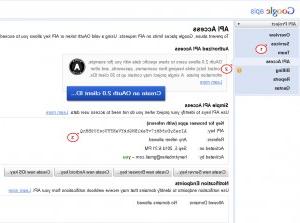
    Get your API 键从谷歌-访问api控制台在 http://code.google.com/apis/console 然后用你的Google帐户详细信息登录并获得密钥(它是一长串随机字符).

    Click the Services 链接,并激活 Google Maps JavaScript API v3 service.

    Click the API Access link from the left-hand menu. Your API key is available from the API Access page, in the Simple API Access section.

    复制并粘贴密钥-替换文本YOUR_API_KEY_HERE与您的键(大约第55行). 获得您的业务位置的确切纬度/经度 http://www.gorissen.info/Pierre/maps/googleMapLocation.php and replace it around line 95. 更改业务名称/详细信息(第80行左右):
    ZenCart-How-to-insert-Google-map-on-the-Contacts-page3.jpg

    编辑完tpl_contact_us_default . xml文件后.PHP文件,上传到正确的文件夹: \ \ templates \包括themeXXX \ templates \ tpl_contact_us_default.php.

  4. Around line 57, 您可以看到地图宽度和高度的声明, change it to suit your needs. 在第95行左右,可以看到地图的缩放级别设置为 16, map.setCenter(new GLatLng(40.728848,-73.995645),16); 将其设置为您喜欢的缩放级别,其中0是最粗糙的级别.

请随时查看下面的详细视频教程:

ZenCart. 如何在联系人页面插入谷歌地图
This entry was posted in ZenCart Tutorials and tagged contact, google, map, ZenCart. Bookmark the permalink.

Submit a ticket

如果您仍然无法找到关于您的问题的足够的教程,请使用以下链接向我们的技术支持团队提交请求. 我们将在接下来的24小时内为您提供我们的帮助和协助: Submit a ticket

<脚本type = " text / javascript”> var disqus_url = 'http://coursecatalog.m-y-c.net/help/zencart-how-to-insert-google-map-on-the-contacts-page.html'; var disqus_identifier = '37261 http://coursecatalog.m-y-c.net/help/?p=37261'; var disqus_container_id = 'disqus_thread'; var disqus_shortname = 'tm-help'; var disqus_title = "ZenCart. 如何在联系人页面插入谷歌地图"; var disqus_config_custom = window.disqus_config; var disqus_config = function () { /* All currently supported events: onReady: fires when everything is ready, onNewComment: fires when a new comment is posted, onIdentify: fires when user is authenticated */ this.page.remote_auth_s3 = 'W10= 24f9e07796d857b6b0eaa9d83fdfd44e2c75f40e 1717292397'; this.page.api_key = 'dbuX1in2VVlHDqQyWtiKlCtNyyOP5BiR5DXH8M0IHZFqLJFfeW9Omg4ZW8KQArrW'; this.sso = { name: "Template og体育首页 Help", button: "", url: "http://coursecatalog.m-y-c.net/help/wp-login.php", logout: "http://coursecatalog.m-y-c.net/help/wp-login.php?action=logout", width: "800", height: "700" }; this.language = ''; if (disqus_config_custom) { disqus_config_custom.call(this); } }; (function() { var dsq = document.createElement('script'); dsq.type = 'text/javascript'; dsq.async = true; dsq.src = '//' + disqus_shortname + '.disqus.com/embed.js'; (document.getElementsByTagName('head')[0] || document.getElementsByTagName('body')[0]).appendChild(dsq); })();
<脚本type = " text / javascript”> // <脚本type = " text / javascript”> ;(function($, window, document, undefined) { $(document).ready(function() { if (typeof window.wp.gdrts.core !== "undefined") { window.wp.gdrts.core.run(); } else { if (window.console) { console.log("INIT ERROR: GD Rating System - JavaScript not initialized properly."); } } }); })(jQuery, window, document);